
Illustrator for Web: Beginners Step-by-Step Setup Guide
Skip the messy exports and broken layouts. A clean setup means cleaner results, and less backtracking. Follow some of the things I do to set-up for Web and UI design.
 Illustrator is a powerhouse for creating vector graphics, icons, and layouts. However, without proper set-up it can feel sluggish, especially when trying to get assets web ready. This guide walks you through a step-by-step setup to streamline Illustrator for web workflows, Whether you're a graphic designer prepping assets for developers or a solo wanting to do your own indie web dev, these tips will help you out.
Step-by-Step Setup to Optimize Illustrator for Web
Follow these steps to configure Illustrator for efficient web graphic creation. Based on Adobe's best practices and user-tested methods, this setup focuses on web-safe colors, file size reduction, and performance tweaks.
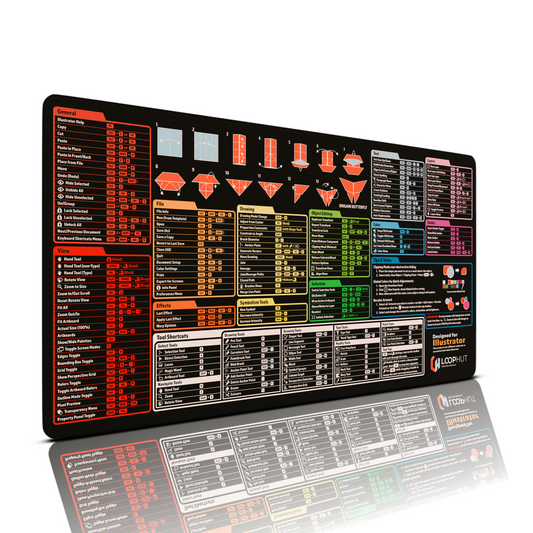
Step 1: Set Up Your Workspace for Web Design
Go to Window > Workspace > Web to load the default web design workspace.
Then select Window > Workspace > New Workspace to save your own custom version.
Open and arrange essential panels:
Layers, Align, Pathfinder, Asset Export, and Properties.
Drag and dock panels to the side for easy access, then save your layout.
Set color mode to RGB:
Go to File > Document Color Mode > RGB Color.
RGB is required for screen-based graphics. Avoid CMYK, which is for print.
Enable Pixel Preview:
Go to View > Pixel Preview to display artwork as it will appear on screens.
This helps identify how sharp or blurry vectors may render in a browser.

Step 2: Adjust Preferences for Performance
Go to Edit > Preferences > Performance (Windows) or Illustrator > Preferences > Performance (macOS).
Increase the Undo limit (History States) from the default 100 to 200 for more flexibility when editing.
In Preferences > Units, set all units to Pixels for accurate web design measurements.

Step 3: Optimize Artboards and Assets
Set Up Artboards for Web Sizes
Use Window > Artboards and the Artboard Tool (Shift+O) to create artboards for different screen sizes:
- Desktop: 1920 × 1080 px
- Tablet: 768 × 1024 px
- Mobile: 375 × 812 px
Name each artboard clearly (e.g., “Home – Desktop”).
Use Symbols for Reusable Elements
Convert repeating elements like buttons and icons into symbols.
Select the object, press F8 or go to Window > Symbols > New Symbol.
Editing one instance updates all others.
Web-Friendly Colors
Set color mode to RGB via File > Document Color Mode > RGB Color (CMYK is for Printed media only).
Open Swatches > Open Swatch Library > Web for web-safe colors.
Avoid colors marked with a cube icon  these are not web-safe and will change.
Simplify Paths to Reduce File Size
Use Object > Path > Simplify to reduce anchor points.
Use the Smooth Tool (under the Pencil Tool) for minor cleanup.
Setup Individual Assets for individual Asset Export
Open via Window > Asset Export.
Drag objects or groups into the panel, or select them and click the + icon on the Asset Export Panel
Assign file formats (SVG, PNG, JPG) and scales (1x, 2x) before exporting.

Step 4: Export Settings for Web
Use “Export for Screens” for batch exporting:
Go to File > Export > Export for Screens to quickly export multiple artboards or assets. Choose output formats like PNG, JPG, or SVG, set resolution scaling (1x, 2x), and define organized output folders.
Export optimized SVGs:
In the SVG options:
Uncheck Preserve Illustrator Editing Capabilities for smaller files.
Enable Minify and Responsive options.
Avoid embedding images, link or optimize separately for web performance.
Balance visual quality and file size:
Set decimal precision to 2 for most vectors (use 3–4 if quality loss occurs).
For vector effects (e.g., glows, blurs), either rasterize them (Object > Rasterize) at 72 PPI or export as PNG to preserve appearance.

Step 5: Test and Preview Your Web Graphics
Preview in a browser:
After exporting your design (SVG, PNG, or JPG), open it directly in a modern browser like Chrome, Firefox, or Safari. This lets you check:
How it renders at different screen sizes
Whether there are any missing fonts, broken effects, or unexpected layout issues
Optimize further with SVGOMG (optional for SVGs):
If you've exported an SVG, you can compress and clean up the code further using a free online tool like SVGOMG. Just:
- Drag and drop your exported SVG into the tool.
- Enable options like "Remove metadata", "Round/reduce precision", and "Remove unused IDs".
- Download the optimized version for final web use.